My Creative Spirit
My Oregon Repurpose, Reuse, Recycle Spirit
My Dave Ramsey Save-Money Spirit...have all come together.....
The Storm At Sea, birthday quilt for my son is all pieced and put together. Next Step....removing the foundation piecing paper from the backside...ick....that'll take a while. (I'll make a reveal post when it is quilted and bound.)
In the meantime, I need a short break but I still have the need to be creative. I've been watching YouTube videos.
Lori Holt of Bee in My Bonnet and Laura Coia of Sew Very Easy are two of my favorites. Their videos are not just quilting related but all manner of fun stuff.
While watching Lori Holt, I came across this video: Making a Design Board.
 |
| Friendship Star Sashing from a Baby Quilt I made in 2016 |
 |
| Jason's Motorcycle Quilt Border, 2018 |
The Dilemma: laying out the pieces on my work surface without knocking them around, getting them out of order or even dropping them on the floor.
The Solution: Lori Holt's Design Board! (FYI: These are sold in Bee in My Bonnet Etsy shop if you are so inclined.
Even so, very nice of Lori Holt to share her secret with us, don't you think?)
Step 1: Grab left over batting from a tub of scraps kept on a high shelf.
 |
| I feel like the Romper Room Lady, looking through her magic mirror; I see strips from (many quilts in the past.) |
Step 2: Search through the strips bin to find something cute.
(These are not all the strips I have... I have four strip bins.)
Step 3: What to use as a base? A yard sign I hung from my balcony announcing the Christmas Eve service at my church will work!
NOTE: This sign is some kind of plastic. While a hot glue gun was great for attaching the batting to the face of the board, it was no bueno for attaching the binding to the back (to flip forward).
It would not stick. I had to use Elmers glue and A LOT of clips...then wait, wait, wait for the glue to dry.
I was able to switch back to using the glue gun when I flipped the binding to the face of the board. The batting is very porous, so that worked.
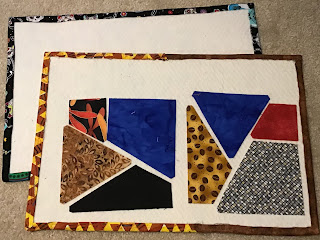
And, TA-DA! While they're not perfect, I think they will do! AND, no money was spent making this project. (And more importantly, no trips to the hobby store were made, since we are supposed to be safer-at-home.)
Two Rabbit Trails:
RT One. Making the binding (this is not like a regular quilt binding as you may have noticed from Lori Holt's video). I took this opportunity to try out a little gadget I purchased how many years ago????
Sashers by Pauline's Quilt World. I purchased these at some quilt show and I cannot remember the year. I'd like to say the process was so much easier than the long way, but I found them cumbersome. The fabric kept twisting.
To be fair...I didn't stop and watch the how to video because this was a quick and dirty project and I frankly didn't want to spend that much time.
But now that I've broken the seal on the package, I think I'll try to incorporate them into my binding-making and learn the proper way to use them.
RT Two-The pieces on my new Design Board: Some time back (again, I don't remember how many years back, but I was already living in my new state so not more than nine years) my friend, Miss Mary, gave me these acrylic templates Scrap Crazy 6 by Karen Montgomery. I started cutting scraps and arranging them in a storage box. The box was placed on the shelf and there it sat. Looking for some pieces to act as models for my new Design Board
I spied with my little eye.....
Now that I've dusted off the top of the box, I think I'll use these as Leaders and Enders. If you are not familiar with Leaders and Enders, check out Bonnie Hunter's website and blog, Quiltville. I think she is the original Leaders and Enders lady.
As an added bonus she has so many ideas and loads of free patterns, too!
Using these pieces as Leaders and Enders will someday give me an Accidental Quilt!!
 |
| Picture plucked off Pinterest. Cute idea! I like the top stitching making it look like a Crazy Quilt. |
UPDATE: I do like these Design Boards. But, I found an easier way.....
Use Elmers Spray Glue to stick the batting down and skip the cute borders. I made two sizes. Really useful!


No comments:
Post a Comment
Note: Only a member of this blog may post a comment.