Tuesday, August 18, 2015

Stories of Understanding Husbands

I'm not married so I sew when I want to sew, in any room of the house, leave my mess everywhere and no one is "miffed."  Every now and again a story about helpful, understanding husbands-of-sewers-and-quilters pops up on Facebook and it makes me smile....(makes me wish I had one, too...)


My first pretend "Sweet Hubby Award" is from the Project of Doom Facebook group.  This is a quilt pattern of Harry Potter's bookshelf...all PAPER PIECED.  Removing the paper after the blocks are sewn together is kind of a beast of a job.  Kudos to this helpful hubby!!
(If you are interested in this project, follow this link to Fandom In Stitches. )

This next post from the Singer Featherweight 221 & 222 Facebook group.
I've seen many posts where husbands have loved on their wives by refinishing their tables, fixing their sewing machines, even visiting flea markets and estate sales to make purchases for their brides, etc.  Ahhhhh, too sweet!


Husbands have been known to rearrange their travel plans, rearrange their lives and rearrange their living spaces to accommodate our obsession....

Last wonderful hubby story... This past Memorial Day weekend I flew to Portland (my home town) to visit a friend who was visiting in Portland from France.  While there, another friend, Dawn White, met Anna (my friend from France) & me and my daughter Ana for lunch and then took us to her house for a trunk show!  We four ladies invaded her hubby's space for the entire afternoon...even caught him off guard in his boxers..... He just smiled and said "welcome." Charlie you're the best!

 
PS.  If you have not discovered Dawn's Blog yet, here is a link.  She is quite talented and teaches classes at The Pine Needle in Lake Oswego, Oregon.


So... Here's to you, understanding hubbies everywhere!

Saturday, August 15, 2015

Dog Days of Summer


I've been so uninspired of late.... I feel restless and aimless.  It's been hot and work has been boring.  Is this what they call the "dog days of summer?"

 Does this happen to you?  What do you do?

Friday, August 7, 2015

Yeah!! It's Friday!!

It's been a long work week and I am so, so, so happy it is FRIDAY! 


I plan to visit a few fabric stores this weekend.  I've been bitten by the "Row By Row" bug.  I don't actually have time to sew the quilt right now, but I'd like to pick up a few patterns from some quilt stores.

There will be a few weeks between Thanksgiving and Christmas when I should have time for a new project. 

I really like this quilt...It has such a nice layout and I like what she did with the license plates.


Sew Happy!

Sunday, August 2, 2015

Pin Cushions

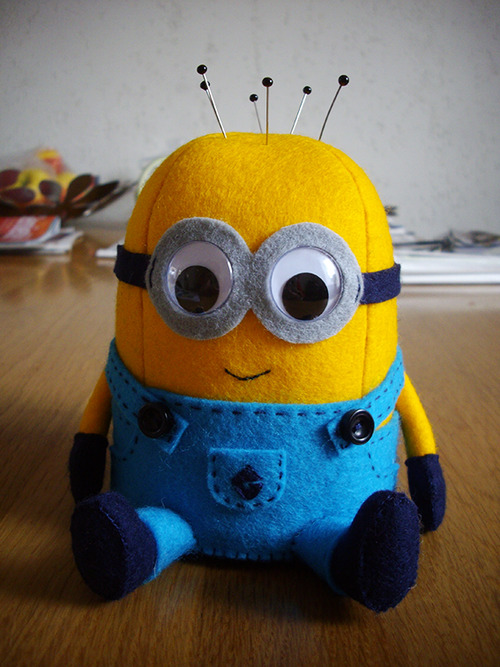
I have seen some cute pin cushions.  With my OCD I could easily have a vast collection, so I don't collect them.  However, just this morning I ran across this pin cushion pattern on Facebook. I think I just MUST make one...or two...or three...!  It is by "Lady Joyceley" HERE is the link.  Isn't it just the cutest thing you've ever seen?!  Once again I am amazed by other's talents and creativity.

Here is a step-by-step tutorial for my big Minion pincushion. I’m no pro at explaining so if something is unclear, feel free to ask me about it :)
If the download link isn’t working for you, please send me an ask so I can fix it. Please say what it is about, otherwise I maybe won’t understand because I get asks about a lot of other stuff as well, thank you!
Here is a download link for the PDF tutorial, in case you want to safe it on your computer/print it. This is the tutorial only, download the pattern by clicking on one of the links below.
The pattern for the Mini Minion can be downloaded here.
The pattern for the Big Minion can be downloaded here.

Minions made with this pattern:

Send me a link to a picture of your minion and I’ll put it here for other people to check out! :) (If you want me to of course, I will ask you first before doing so). You can send it to my ask-box (just put brackets around the dots in the link) or you can send it through fan-mail. If you want to send it to my email please message me about it off-anon so I can give you my email privately.
—————————————————————————————————————

Okaaay, we’re going to start with the material list. 

What you’re going to need is:

  • Felt in 4 different colors : Yellow, blue, light gray and black/dark blue.
    (I used dark blue)
  • Wobbly eyes that are 2cm in diameter (use 1cm ones if you make the mini minion). Or if you don’t have those, use some white and black felt.
  • 4 tiny black buttons
  • Needle and thread (yellow, black or dark blue depending on the color felt you’re using)
  • Sewing machine
  • Fiberfill. If you can’t find it in a store where you live, just buy the cheapest pillow you can find. They usually have the same stuff in it and it works just as fine.
  • Glue

What you need to do:

  1. Cut out all pieces in the right colors and as many times as mentioned on the pattern.
    Body A, B = Yellow
    Pants A, B, C, D & Pocket & Leg = Light blue
    Boots & Gloves = Black or dark blue
    Goggles = Light gray

    DO NOT FORGET TO LEAVE SEAM ALLOWANCE ON THE PIECES FOR BODY A. I forgot to leave seam allowance on one of the pieces so just putting it out there lol.

    Important for Big Minion: Fold the fabric for Pants C so there is enough fabric for the pattern piece to be cut from both layers. When you’re done it should look like a full circle.
  2. Sew the parts for the body together with a sewing machine. If you don’t know how, here and here they show how to do it (Also a video here). The only difference is that you’ll have a large opening in the bottom.
  3. Sew the bottom (Body B) on Body A with a Blanket stitch. Leave an opening for the fiberfill.
  4. Fill the body firmly with fiberfill and sew the opening shut.

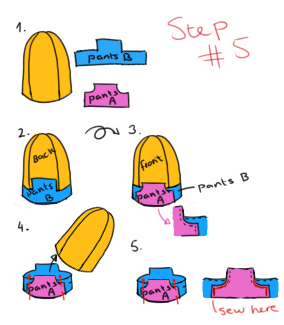
  5. This part is hard to explain for me so bear with me please lol.
    2. Take Pants B and pin it snugly on the bottom of the body. Don’t worry, it is only temporarily.
    3. Now take Pants A and pin it in the middle of the open space between the ends of Pants B. It should look like in my picture of my minion, as if he already has his pants on.
    4. Now take some pins and pin only the parts of his pants together, don’t pin it to the body. Take the rest of the pins out now, but leave the pins that hold the pants together. Since the pins are holding part A and B together now, you should be able to take of the whole pants in one go without them falling apart.
  6. Stitch Pants A and B together with a Running stitch or Back stitch as marked with a dashed line on the pattern. This stitch is going to be both decorative and hold everything together so do this as neatly as possible.
  7. Embroider the logo on the pocket and sew it on Pants A with a Running stitch.

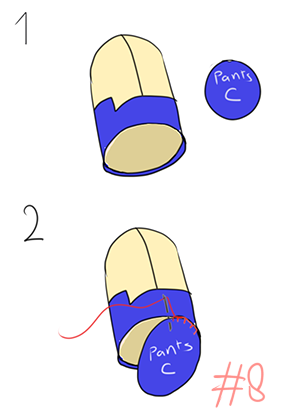
  8. Attach Pants C to the rest of the pants like in step 3.
    Put the pants on the body.
  9. Sew a Running stitch on both of the Legs and Pants D’s as marked on the pattern with a dashed line.

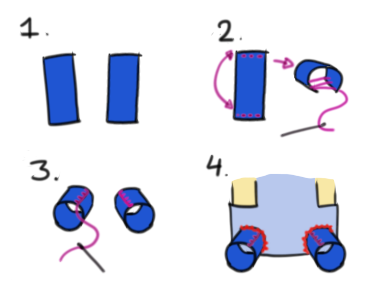
  10. Take one of the leg pieces and sew to short ends to eachother.Do this with the other leg piece as well. You should have 2 loops when you’re finished. After you’ve done this sew them to the bottom the body as shown in the picture above.
  11. Sew the boots and soles together with a blanket stitch. I find it easiest to first sew the curved sides of the boot and then to attach the sole (like in step 3).
  12. Sew the gloves together with a blanket stitch.
  13. Fold the arms in the middle and sew with a blanket stitch.
  14. Fill the glove with a little bit of fiberfill and stick the straight side of the arm into the glove. Sew the arm and glove together with a back stitch.
  15. Fill the legs and boots with a bit of fiberfill and attach them to each other with a back stitch.
  16. Sew the arms to the body.
  17. Attach Pants D to the front and back of the pants with buttons (look at my picture for reference).
  18. Pin the Goggles on the body where you want the face to be. Glue the eyes inside the holes of the goggles.
  19. Cut a long thin strip of felt for the strap of the Goggles. Make sure it is long enough to reach around the head from one side of the goggles to the other. Leave a bit of seam allowance on both ends so you can attach them to the goggles.
  20. Pin the strap in place.
  21. Glue the Goggles in place and tuck the ends of the strap under the Goggles and sew with a back stitch as marked with a dashed line on the pattern. Attach the strap to his head with a back stitch.
  22. Embroider a mouth on his face.
Congratulations! You are now finished! I hope you like your end result and I would love to see pictures!!
This pattern is for personal use only. You do not have permission to use this pattern for commercial use and you may not offer this pattern or a modified version of this pattern in exchange for payment. This pattern is free and shall always be free for everyone to use.

Saturday, August 1, 2015

Asking the Experts

A week or so ago I wrote a post about my "pig dilemma."  See it HERE.
Ya see, I'm pretty good at quilting...using a pattern...but not so good at creating something on my own.

Well, no one posted suggestions.....(insert sad face here.)


What to do, what to do...


Then it occurred to me ... FACEBOOK!  There I will find expert quilters.  
I could simply ask! Well, dah.


My number-one, favorite quilt designer is Dawn White of First Light Designs.  So creative and my favorite person to hang around with when I'm in Portland...well, second favorite...after my daughter, Ana.  (Hope to see you in August, Dawn.)


A shout out to MaryJo Boyd of The Quilt Bear.... we met by accident about 5 years ago in (of all places) Lincoln, Nebraska and who I get to hang with when I return to (of all places) Lincoln, Nebraska every March.  Creative and sweet and my Spiritual Sister. (Love you, M.J.)


I don't want to forget my brand new BFF, Terry Waldron,
who I've yet to meet face-to-face but her quilts are stunning!  AND, she teaches classes!
There is one coming up in October in Palm Springs...follow this LINK.
You MUST check out her website!
(We're still trying to plan a lunch date.)

So, what do you say, creative ladies, can you help me?

I can't post this "public" on FB....the intended family may see it and that would spoil the surprise.... I posted it as "custom" to only a few quilter-type people...at least I HOPE that's what I did.